How do I find inactive items?
Identifying Inactive Items in XSite: A Comprehensive Guide
Introduction
In XSite, both active and inactive items, along with their historical data, are retained within the system. This feature is instrumental for making informed sales decisions. This guide provides a detailed walkthrough on how to locate inactive items within XSite.
Locating Inactive Items (XSiteIO)
-
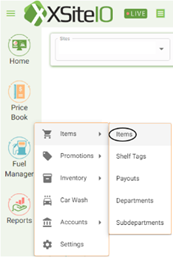
Accessing Items Page: Start by hovering over 'Price Book' on the left-side menu, then hover over 'Items' and click on
 'Items'. By default, this page will display 'Active Items'.
 -
Switching to Inactive Items: Look for the slider button
 located in the top right corner of the page. Click this button to switch to the 'Inactive Items' view. This section will list all items that are currently marked as inactive.
 - Viewing Inactive Items: The 'Inactive Items' page will present a comprehensive list of items not active in your inventory. Here, you can review the items along with their details.
- Reactivating Items: If you wish to change an item's status back to active, locate the 'Status' column. Click on the 'Inactive' button corresponding to the desired item to toggle its status to ‘Active’.
- Deactivating Active Items: Conversely, within the 'Active Items' page, pressing the 'Active' button next to an item will switch its status to inactive.
-
Synchronizing Changes: After making any status changes, it is crucial to click the 'Sync' button
 at the top of the page. This action ensures that the modifications are updated in XSite and reflected in your POS system.
 -
Deleting Items: If you decide that an item is no longer needed, you can permanently remove it by clicking the 'Remove' button in the 'Inactive Items' section.
-
Note: Deleting an item will also erase its historical data. Exercise caution with this option to avoid unintentional loss of valuable information.
-
Note: Deleting an item will also erase its historical data. Exercise caution with this option to avoid unintentional loss of valuable information.
Locating Inactive Items (XSite Classic)
-
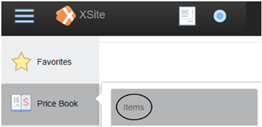
Accessing Items Page: Start by hovering over 'Price Book' on the left-side menu and click on 'Items'. By default, this
 page will display 'Active Items’.
 -
Switching to Inactive Items: Look for the slider button
 located in the top right corner of the page. Click this button to switch to the 'Inactive Items' view. This section will list all items that are currently marked as inactive.
 - Viewing Inactive Items: The 'Inactive Items' page will present a comprehensive list of items not active in your inventory. Here, you can review the items along with their details.
- Reactivating Items: If you wish to change an item's status back to active, locate the 'Status' column. Click on the 'Inactive' button corresponding to the desired item to toggle its status to 'Active'.
- Deactivating Active Items: Conversely, within the 'Active Items' page, pressing the 'Active' button next to an item will switch its status to inactive.
-
Synchronizing Changes: After making any status changes, it is crucial to click the 'Sync' button
 at the top of the page. This action ensures that the modifications are updated in XSite and reflected in your POS system.
 -
Deleting Items: If you decide that an item is no longer needed, you can permanently remove it by clicking the 'Remove' button in the 'Inactive Items' section.
- Note: Deleting an item will also erase its historical data. Exercise caution with this option to avoid unintentional loss of valuable information.