How do I add an item?
Efficiently Expanding Your Product List with XSite
Introduction
This section provides detailed instructions for adding an item to the inventory using XSite. Prior to starting this process, ensure you have all necessary information regarding the item, such as cost, supplier details, tax obligations, and the purchasing format (e.g., case, carton, or single units). Incomplete data can be updated subsequently, but it is advisable to have all details on hand to streamline the item addition.
It is recommended to purchase a scanner that can easily scan and input items directly into XSite. We recommend the following Scanner. If you have trouble setting up the scanner, don't hesitate to reach out to XSite for support.
Adding an Item in XSite Classic
- Access the 'Price Book' section from the sidebar menu.
- Click on the 'Items' tab to proceed.
- Locate and select the ‘+’ icon at the top of the interface to add a new item.
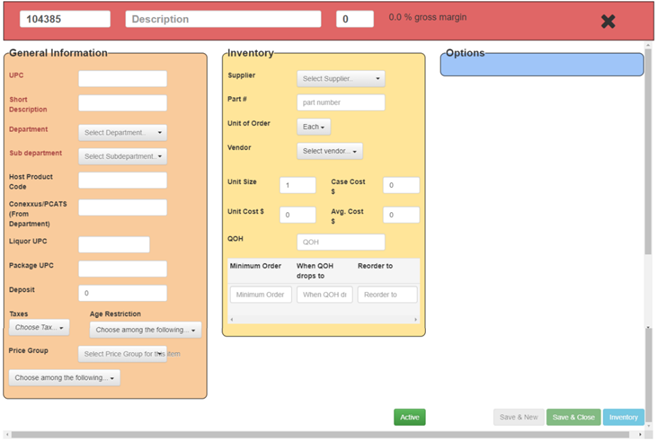
- Observe that a PLU number is auto generated at the top of the screen.
- Next to the PLU field, enter the item’s description.
- To the right of the description, input the item's selling price.
- In the 'General Information' area on the left side, fill in the UPC. Make sure to never add the check digit, which is the last digit in the UPC code.
- From the dropdown lists provided, select the appropriate department and sub-department for the item.
- Continue to input all other relevant data.
- Once all information is entered, navigate to the bottom right of the page.
- To save and conclude this entry, click ‘Save & Close’.
- If you need to add another item immediately after, click 'Save & New'.
Note: After saving, verify that all information is correct. Any missing or inaccurate details should be updated at this stage to ensure inventory integrity.

Adding an Item in XSiteIO
- From the 'Price Book' section within the sidebar menu, click on the 'Items' tab.
- Select 'Items' from the submenu to move forward.
- Click the icon ‘+’ located at the top of the interface to begin adding a new item.
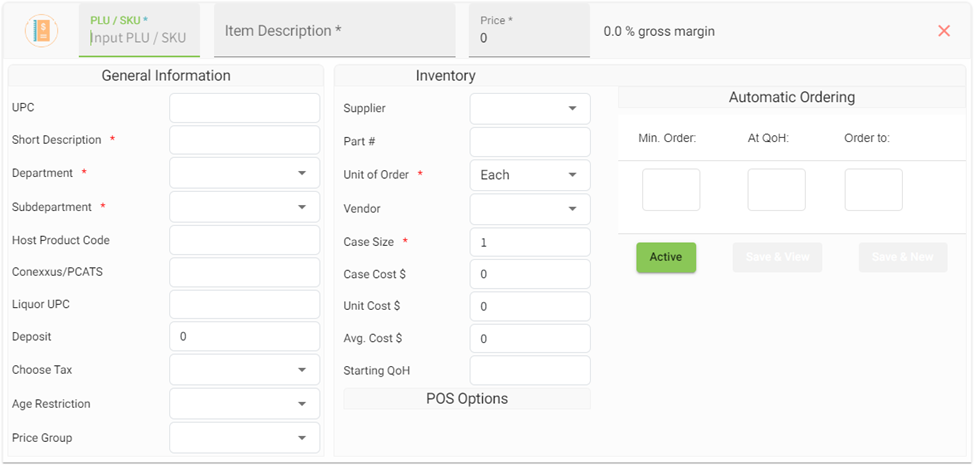
- Notice the automatic generation of a PLU/SKU number at the top.
- Fill in the item’s description to the right of the PLU/SKU.
- Further to the right, enter the selling price of the item.
- In the 'General Information' section on the left, input the item's UPC.
- Fields denoted with an asterisk (*) are required. Complete these fields, including selecting the appropriate department and subdepartment.
- Continue to input all other essential details.
- On the right side of the page, choose 'Save & View' to save the entry and review it.
- If you are planning to add another item immediately, select 'Save & New'.
Note: If any required information is missing, the 'Save & View' and 'Save & New' buttons will be inactive (greyed out). Ensure all required fields are filled to enable these options.
