How do I add a deal group?
A step-by-step approach to creating deal groups.

Written by Michael Cook
Updated at June 27th, 2025
Introduction
The ‘Deal Groups' feature in XSiteIO is a versatile tool that enables you to group multiple items under a single promotional price or to offer discounts based on specific criteria. This functionality is particularly useful for incentivizing customers with special offers, such as providing a discount on fuel when a certain quantity is purchased.
Begin by setting up a discount push key on your Bulloch system.
Creating a Deal Group in XSiteIO
- Create an item with the same name as the discount you established in Bulloch. This item will be pivotal when assembling the deal group. Note: Refer to the ‘How do I add an item?’ guide for detailed steps.
- Helpful Tip: Activate the ‘Next PLU Number’ feature for easier management.
- Access this by selecting the settings icon in the lower left corner of the screen.
- Choose ‘General’, followed by ‘Options’ on the right.
- In the ‘Values’ column of the ‘Next PLU Number’ row, input a starting number for the next PLU. Starting with a 5-digit number is recommended to simplify item searches by PLU.
- Click the green ‘Save’ button.
- Helpful Tip: Activate the ‘Next PLU Number’ feature for easier management.
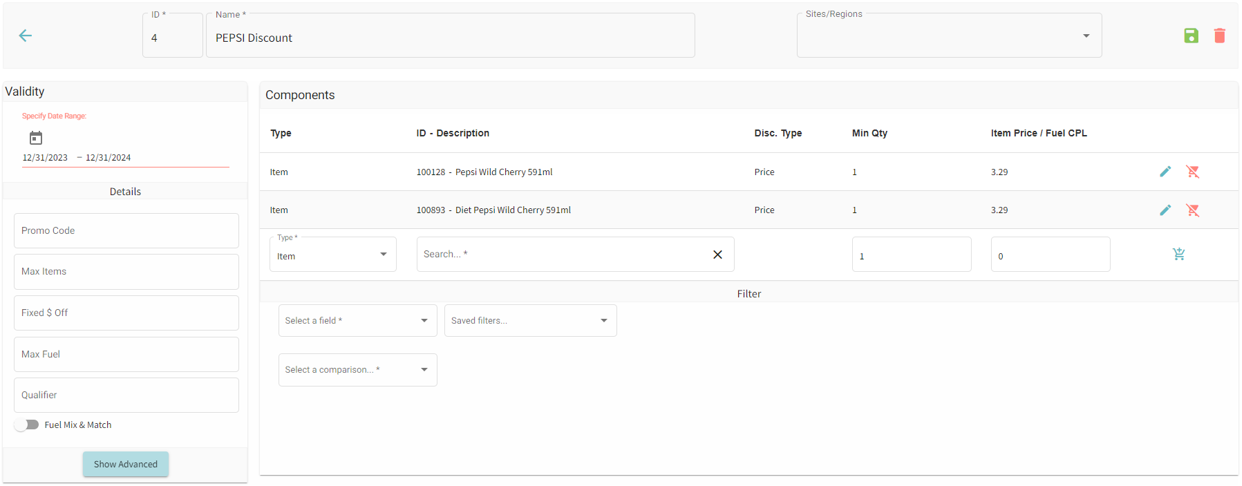
- From the XSiteIO home screen, go to ‘Price Book’, then ‘Promotions’, and finally select ‘Deal Groups’.
- Click on the ‘+’ icon in the top-left corner to create a new deal group.
- Input a descriptive name for the discount you are implementing and select ‘Add Beware Deal Group’ to confirm.
- The newly created discount will be listed with an auto-generated ID.
- Select the discount you've created to access its modification menu.
- Under ‘Sites/Regions', pick the site where you want the discount to be active.
- Within the ‘Details’ menu:
- Specify the date range for the discount.
- Complete any relevant details for the discount.
- Within the ‘Components’ menu:
- Add individual items to the deal group using their PLU, UPC, or Description, OR utilize the filter tool.
- Important: Add the discount item created in step 1.
- Once all components are included, secure the settings by clicking the ‘save’ icon at the top right, next to the trash bin icon.
Creating a Deal Group in XSite Classic
- Create an item with the same name as the discount you established in Bulloch. This item will be pivotal when assembling the deal group. Note: Refer to the ‘How do I add an item?’ guide for detailed steps.
- Helpful Tip: Activate the ‘Next PLU Number’ feature for easier management.
- Access this by clicking your profile name in the top right corner and select ‘Settings’.
- Choose ‘Options’ on the right.
- In the ‘Next PLU Number’ row, input a starting number for the next PLU. Starting with a 5-digit number is recommended to simplify item searches by PLU.
- Click on the blue ‘Save’ button.
- Hover over ‘Price Book’ from the side menu and select ‘Deal Groups’.
- Click the ‘+’ button at the top left to initiate a new deal group.
Note: If visibility is an issue, condense the menu by selecting the list icon at the top left. - An identification number for the deal group will be automatically assigned.
- Under the ‘Name’ field, input the chosen name for the deal group.
- Confirm the addition by clicking the blue ‘Add’ button on the right.
- Manage the deal group by clicking ‘Manage’.
- Add individual items using PLU, UPC, or Description, OR associate the group with an existing item list or price group.
- After including all components, update the group by clicking ‘update components’.
- Conclude the process by selecting ‘close’ in the top right.
- Finalize the deal group settings:
- Locate the new deal group under ‘Deal Groups’ and click its name.
- In the ‘General’ section, add any necessary details as required.
- Apply the updates by clicking the blue ‘Update’ button in the top right corner.